Port Address Translation (overload)

Port Address Translation (overload)


Syntax to implement NAT on Router

Syntax:

Router(config)#interface <type> <no>

Router(config-if)#ip NAT inside

This command need to be given on interface where LAN (Private) Network is present

Router(config-if)#ip NAT outside
This command need to be given on interface where WAN (Public) Network is present


Syntax for configuring PAT is as Follows :

Syntax:

Router(config)#ip nat inside source list <ACL-NO> <Pubiic IP / interface <type> <No> > [overload]


Network Address Translation - NAT

Network Address Translation - NAT
(Static)


Network Address Translation is a feature to modify the Network address information, it is basically mapping feature which is mapped one IP address to another.

Syntax to implement NAT on Router

Syntax:

Router(config)#interface <type> <no>


Router(config-if)#ip NAT inside

This command need to be given on interface where LAN (Private) Network is present


Router(config-if)#ip NAT outside 
This command need to be given on interface where WAN (Private) Network is present

Syntax for configuring static NAT is as Follows:

Router(config)#ip nat inside source static <Private IP> <Public IP>

Spanning Tree Protocol - Verification

SPANNING TREE PROTOCOL - VERFICATION

Switch#sh spanning-tree
VLAN0001
  Spanning tree enabled protocol ieee
  Root ID    Priority    32769
             Address     0001.43D4.9A23
             This bridge is the root
             Hello Time  2 sec  Max Age 20 sec  Forward Delay 15 sec

  Bridge ID  Priority    32769  (priority 32768 sys-id-ext 1)
             Address     0001.43D4.9A23
             Hello Time  2 sec  Max Age 20 sec  Forward Delay 15 sec
             Aging Time  20

Interface        Role Sts Cost      Prio.Nbr Type
---------------- ---- --- --------- -------- --------------------------------
Fa0/1            Desg FWD 19        128.1    P2p
Fa0/2            Desg FWD 19        128.2    P2p
Fa0/3            Desg FWD 19        128.3    P2p
Fa0/4            Desg FWD 19        128.4    P2p

PORT-SECURITY

PORT-SECURITY

The Port Security feature is used to restrict traffic on a switch interface (also called a "switchport") by identifying and limiting traffic allowed to enter that port based on source Ethernet MAC addresses.

Syntax to configure port security on a switch interface

Syntax:

Port Security:

Switch(config)#interface <type> <No.>

Switch(config-if)#switchport mode access

Switch(config-if)#Switchport port-security maximum <No. of MAC address>

Switch(config-if)#Switchport port-security mac-address <MAC ADDRESS/ sticky>

Switch(config-if)#Switchport port-security violation <shutdown/protect/restrict>

Switch(config-lf)#Switchport port-security

INTER-VLAN ROUTING

INTER-VLAN ROUTING


Inter-VLAN routing is the process of forwarding network traffic from one VLAN to another VLAN using a router.


To Create a VLAN on a Switch

Configure VLAN on switch

Syntax:

Switch(config)#vlan <VLAN No.>

Switch(config-vlan)#name <name>


To assign a interface to VLAN


Switch(config)#interface <type> <No.>

Switch(config-if)#switchport mode access

Switch(config-if)#switchport access vlan <VLAN No.>

Switch(config-if)#exit


VLAN Trunk Protocol (VTP)

VLAN Trunk Protocol (VTP)

VLAN Trunk Protocol (VTP) reduces administration in a switched network. When you configure a new VLAN on one VTP server, the VLAN is distributed through all switches in the domain. This reduces the need to configure the same VLAN everywhere. VTP is a Cisco-proprietary protocol that is available on most of the Cisco Catalyst series products.


To configure VTP on Switch Syntax:

Syntax:

Switch(config)#vtp domain <name> 

Switch(config)#vtp mode <serer / client / transparent 
Switch(config)#vtp password <password> 
Switch(config)#vtp pruning                          (only on the server switch)


TRUNKING

TRUNKING


To configure a trunk link on interface

Syntax:

Switch(config)#interface <type> <No.> 

Switch(config-if)#switchport mode trunk 
Switch(config-if)#switchport trunk allowed vlan <all | No.>

VIRTUAL LOCAL AREA NETWORKS (VLANs)

VIRTUAL LOCAL AREA NETWORKS (VLANs)

“A virtual LAN (VLAN) is a group of networking devices in the same broadcast domain”

To verify the current configuration of the Switch.


Syntax:

Switch#show vlan

Output:


PASSWORD RECOVERY

PASSWORD RECOVERY


The following steps are required to reset the password of Cisco Router. 

The procedure for Fixed & Modular Router is different.


Step1:

Connect the console port of Router to com port of PC

Step2:

Configure the hyper terminal software for console communication (see steps as shown in Initial configuration)

Step3:


Switch 'ON' the rputer (if it is already 'ON', restart it by using power button).

Step4:

Press "Ctrl + Break" within 60 sec after power on.

Step5:

Router will enter Rom monitor mode.


IOS BACKUP

IOS BACKUP


To take backup of the IOS and router configuration (like the Running configuration and the Startup configuration) follow the procedure below:

First install the TFTP server software on a PC in the network and at the time of taking backup the software should be running (Application is ON) on the PC where it is installed. Then Login to the router and go to the privilege mode


To take the backup of the startup configuration use the following command:

CISCO DISCOVERY PROTOCOL - CDP

CISCO DISCOVERY PROTOCOL - CDP


CDP is enabled by default on all Cisco devices. It is used for troubleshooting connectivity between Cisco devices. To check the output of Cisco discovery protocol (CDP) use the following commands.

The following command will show CDP hello and the hold-down interval.

Syntax:

Router#show cdp


KOLKATA#sh cdp
     Global CDP information:
     Sending CDP packets every 60 seconds
     Sending a holdtime value of 180 seconds
     Sending CDPv2 advertisements is enabled


The following command will show the brief information of the directly connected Cisco devices Like hostname, interface to which it is connected, the model of the device etc.


EXTENDED ACCESS CONTROL LIST

EXTENDED ACCESS CONTROL LIST 


Configure Extended ACL as follows

Syntax:

Router(config)#access-list <no.> permit/deny <protocol> <source ip> <source wildcard mask> 
<destination ip> <destination wildcard mask> [operator] [port]

To implement ACL on a Interface

Syntax:

Router(config)#interface <type> <no.> 

Router(config-if)#ip access-group <no.> in/out


On Kolkata:

SCENARIO 

Configuration of an access-list on KOLKATA such that Deny Kolkata LAN from accessing HTTP Server in LAN of Mumbai LAN i.e 192.168.2.0 and also deny ping to Delhi LAN i.e 192.168.1.0 .


STANDARD ACCESS CONTROL LIST

STANDARD ACCESS CONTROL LIST
(STANDARD ACL)


Configure Standard ACL as follows:

Syntax:

Router(config)#access-list <no.> permit/deny <source ip> <source wildcard mask>


To implement ACL on a Interface

Syntax:

Router(config)#interface <type> <no.> 
Router(config-if)#ip access-group <no.> in/out


On Kolkata:

SCENARIO 

Configuration of an access-list on KOLKATA such that 192.168.0.4 should not communicate with 10.0.0.0 network.


Open Shortest Path First (OSPF)

Open Shortest Path First (OSPF)


To configure OSPF routing protocol use the following command:

Syntax:

Router(config)#router ospf <process id>

Router(config-router)#network <network ID> <wildcard mask> area <area no>


Configurations of Routers are given below: 


Enhanced Interior Gateway Routing Protocol (EIGRP)

Open Shortest Path First (OSPF)


To configure OSPF routing protocol use the following command:

Syntax:

Router(config)#router ospf <process id>

Router(config-router)#network <network ID> <wildcard mask> area <area no>


Configurations of Routers are given below: 


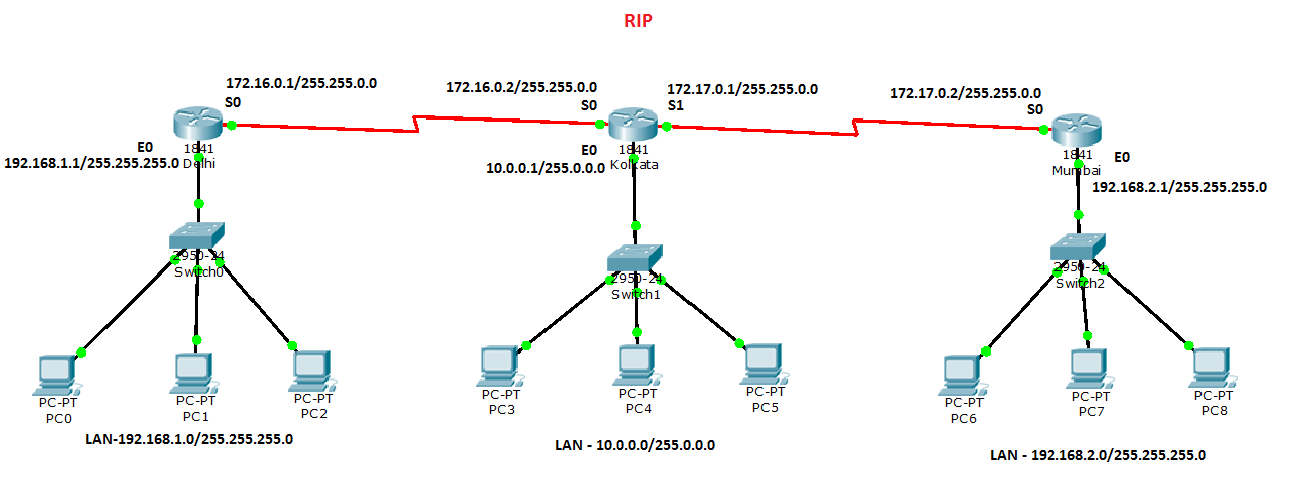
ROUTING INFORMATION PROTOCOL (RIP)

ROUTING INFORMATION PROTOCOL (RIP)

Enable RIP and advertise the directly connected networks using the following commands.
Syntax:
Router(config)#router rip
Router(config-router)#network <network ID>


Configurations of Routers are given below: 

Basic IOS Commands


Basic IOS Commands
A Cisco router without a startup-config file will enter in the setup mode, which you can exit to access the Command Line Interface (CLI). The setup mode offers the Basic Management and Extended Setup. You can enter the setup mode again with the command setup at the CLI.

Cursor Commands:


General commands entered in the “#” mode:
clock set hh:mm:ss d month yyyy: sets the current time and date.
show history/terminal: shows last 10 commands (history) or terminal config and history buffer size (terminal).
terminal history size size: sets the history buffer size where size is between 0-256.
terminal no editing: disable or enable the terminal editing keys in the table above.
show version: displays basic IOS and router information, as well as names of config files and boot images, and config register.
show flash: displays the content of the Flash memory, and if only one IOS is in Flash memory, will output the same as show version.
show startup-config/running-config: displays current and NVRAM based configuration files.
copy running-config startup-config: used and required to save the current configuration. Reverse to restore.
erase startup-config: resets the router’s NVRAM. The router will boot in setup mode next time.
ping/trace/telnet: tools provided to verify connectivity. U=Unreachable, ?=Unknown packet received, .=Time down, P=Unreachable port received.
clear counters interface: clears the “show interface” counters on this interface.
show controllers type number: information about the physical interface itself. A space is required between type and number.
reload: reboots the router and reloads the startup-config file.
boot system rom/flash img: indicate what image the router will use during the next boot.
boot system tftp img address: tells the router to use the configuration file img from a tftp server at address.
config terminal/memory/network: used modify the configuration from the running-config, the startup-config or a from a TFTP server.
Commands entered in the Global Configuration “(config)#” mode:
hostname name: used to define a hostname that is locally significant only.
enable [secret] password password: sets enable or secret mode password. secret will override the non-secure password if set and is encrypted.
[no] service password-encryption: encrypts or not (no) the enable and line passwords.
banner login/motd char: sets the login or message of the day banners, where char is the delimiting character.
interface type [slot/]number[.subinterface]. You can skip the space between the interface type and its number. Certain switches equipped with VIP cards use the syntax interface type slot/pan/number[.subinterface] where pan is the Port Adapter Number.
line (vty number number)/(aux/ console number): used to enter the configuration of the console, aux line or VTY lines (telnet).
Commands entered in the “(config-if)#” mode:
description name: used to define a description for the interface. Name must have underscores rather than spaces. show run and show int 0/n will both show the descriptions set on the interfaces.
no shutdown: used and required to bring up an interface. The interface will show as administratively down.
ip address ipaddress subnetmask: used to set the IP address and subnet mask of an interface.
clock rate bps: sets the clock rate on serial ports.
bandwidth kbps: sets the bandwidth of a serial port for routing and STP protocols to establish the best path.
Commands entered in the “(config-line)#” mode:
logging synchronous: stops console msgs from overwriting command line inputs.
exec-timeout min sec: sets the time-out to min sec for the console.
[no] login: used to set the password when followed by password password. A password is required on the VTY lines before Telnet can be used by default unless no login is used.
Router Memory:
ROM: Read-Only Memory which stores the bootstrap startup program, the power-on self-test (POST) procedures and a baseline IOS. The ROM also contains the ROM monitor, used for manufacturing testing and troubleshooting, and the Mini-IOS, or RXBOOT, which can be used to bring up an interface and load a Cisco IOS into flash memory.
Flash Memory: EEPROM (Electronically Erasable Programmable Read-Only Memory) which stores the IOS (Internetwork Operating System).
NVRAM: Non-Volatile Random Access Memory stores the startup config. A switch has a separate VTP NVRAM which can be deleted with the delete vtp command.
RAM or DRAM: Random Access Memory - holds dynamic info such as the current configuration file, the current IOS, caching and buffering.